The steps you need to take to build an iOS app
If you're building an iOS app and you're not an experienced developer, understanding the steps involved helps you find the right people for the job
1 abr 2020 • Lectura de 9 minutos
Actualizado el 19 ago 2020 por Closed User
G
Closed User
Falló el copiado al portapapeles. Intenta de nuevo después de ajustar tus permisos.
Copiado al portapapeles.
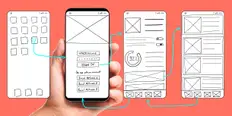
List of steps for building an iOS app
If you think you might have a great idea for an app, but aren’t skilled in app development, knowing who to hire and what you can DIY vs. hiring a skilled app developer isn’t always as straightforward as it seems.
Understanding the steps involved can help you find the right people for the job, while giving you a deeper appreciation for the overall process.
In this post, we outline the key steps involved in building an iOS app.
Understanding the iOS app development process
So, you think you’ve got a great idea for an app; so, what’s next?
In what has felt like an absolute whirlwind of a decade, Apple has revolutionized the retail landscape with their no- fuss marketplace of bite-sized digital indispensables.
An app can be so many different things: a feature to augment your device, a piece of entertainment, a shopping portal within a shopping portal. It's whatever a consumer's heart desires, really. And if you do nail the perfect idea? A multi-million dollar payday could be in your future.
All that being said, there can often be a pretty sizable barrier standing between an inventive visionary (such as yourself) and a quality finished product.
Making a world-class app isn't like whipping up a PowerPoint presentation. Depending on the complexity of your concept, a decent-sized team of specialists could be needed to develop your initial outline and take it through to a fully-fledged app, ready for human consumption and submission to the Appstore.
Without getting too engrained in the finer details, we shall now provide you with a quick and dirty overview that covers
Who you need to hire
What you need to provide them with
The most common steps are in the average development process.
The more you know about what's involved, the more adept you will be at managing the overall app development team along with your own expectations.
Phase 1: Solidifying your idea
First thing'ss first; you can't sell an idea to a designer and have them lay it out if you do not have complete clarity over the purpose and plan for the app yourself.
What exactly will your bapp accomplish?
What makes it unique?
What are the calculations, formulations, or specifications?
Who is your target audience?
Are there any other similar apps on the marketplace?
Sometimes the best course of action is to define your idea by the app store's own categories. Five years ago, these were Utilities, Entertainment, Games, News, Productivity, Lifestyle and Social Networking. More recently, the have expanded to include Books, Business, Catalogs, Education, Finance, Food & Drink, Health & Fitness, Kids, Medical, Music, Navigation, Photo & Video, Reference, Sports, Travel and Weather.
There are a ton of subcategories that reside under these main umbrellas (curated and regularly changed by Apple themselves) but, ideally, your concept should probably pigeonhole into one of the core options.
So, the first step you need to take is to solidify your idea, perfect your pitch, and document as much as you can prior to engaging with any app development exper. The clearer you can be, and the more time you spend fleshing out and detailing your idea, the easier it will be to get an accurate price and timeframe for delivery.
Follow this project spec outline to cover all of the important information your prospective mobile app developer will need.
A one paragraph summary of the primary goal of your mobile app.
Project budget.
Project deadline.
Intended audience.
Detailed mobile app description.
Description of all key features.
Design and implementation constraints.
Assumptions and dependencies.
Functional requirements.
List and descriptions of all external interfaces.
Brand guidelines.
Phase 2: Sketching out the app
Once you have established the initial framework for your app, along with outlining its key features and functions, you can sketch out the app either by yourself or with your coder.
Mobile app sketches need to follow an objective structure to ensure all involved parties have a unified understanding of it's features.
There are two different types of wireframes, low-fidelity and high-fidelity.
A low-fidelity wireframe communicates the structure of the mobile app. It indicates the relative positions of all the app's elements. Low-fidelity wireframes are purposely simple to help viewers solely focus on the proposed structure without the distraction of fine details.
Once the structure of a mobile app is approved, a high-fidelity wireframe should be created. A high-fidelity wireframe is a mirror image of the final mobile app product, so it's a great opportunity for you to finalize all of the detailed design requirements of your app.
Here's a comparison between low-fidelity and a high-fidelity wireframe.

It's absolutely essential that you complete this two stage wireframe design process before a single line of code is typed out. This reason for this is that any changes to the structure and aesthetics of your prospective mobile app is much faster to execute in the wireframing stages than after the app has been coded. The faster a project can be completed the more cost effective it will be.
Before you start to worry about cost, coders no longer cost a small fortune. The good news, in many cases, is that you won't need a world-class programmer to get a modest app idea off the ground. First of all, Apple has made Xcode freely available. This is a complete developer toolset for creating apps for Mac, iPhone, iPad, Apple Watch and Apple TV. Second of all, it's both a powerful tool and a reasonably understandable one, too. Xcode brings user interface design, coding, testing, debugging, and submitting to the App Store all into a unified workflow. This tool does require technical appreciation and understanding, but thankfully, it also makes it very easy for those with the right skills to get apps designed, developed, and released with ease.
If you're not skilled in Swift and Xcode development, hire a freelance iOS app developer to help you
Believe it or not, sketching out your app can be done without paper and pen. Xcode offers an iOS Simulator that effectively allows you to add, move and resize UI elements pretty easily in a storyboard environment. Once you have the general visual layout you want, you can then select the individual elements and add behaviors and attributes to them to achieve your desired functionality.
Now, this being a visual-heavy side of the app, you should also engage with a UI designer and at minimum a graphic designer to dial in how everything is going to look. Obviously, this is especially true if your app leans toward the entertainment and/or games category. Nobody is having fun if they're fighting to understand what to do. Clear and enticing visuals are essential for pretty much all apps. So, early in the process, you should hire graphics and/or UI designer; you might even be able to find one freelancer that can handle both aspects for you.
It also has to be said that something as complex as a game will require quite a larger team of creatives: artists, sound designers, engine coders, etc. That's a whole different can of worms that we've covered in a completely separate article that can be found here.
Phase 3: Create a Prototype
The end result of this phase needs to lead towards creating a fully-working prototype of the app. Proto.io is one example of an application that can be used for prototyping and it’s been around for over a decade. Apps can be prototyped for anything with a screen-based interface. It uses drag and drop and requires no coding skill whatsoever.
So, if like many budding entrepreneurs with their big ideas and not-so-big budgets, using something such as proto.io can prove to be a great way to mock-up your iOS app, without needing to fork out for a developer to do this for you.
The wireframe designs you created in phase 2 will make the prototyping process much quicker.
You can hire a freelance mobile app developer to create your prototype for you.
Phase 4: Coding the app
Once you're happy with a basic layout (Xcode calls it “the storyboard), you can start fleshing everything out with functionality. For this you can dive into Xcode to take the next steps. Obviously, every idea is going to require a slightly different approach, but for the overwhelming majority of projects you can probably expect to make the following (or a very similar) journey.
#1 - Create a data model
A data model file represents the structure of the information stored in an app. It's the first step in working with what's known as Core Data. Here you define the structure of your application’s objects, including their object types, properties, and relationships.
#2 - Connect the UI to source code
All of the elements in your storyboard now have to be linked to source code. If you're not well versed in the syntax of Swift (Apple's proprietary coding language) you'll need to hire a Swift developer. They will be able to make heads and tails of view controllers that coordinate the flow of information between your app's data model and the behaviors that will occur due to user input.
#3 - Use gesture recognizers to generate events
With this step, you're effectively telling the app what images (or possibly sounds and video content) to show onscreen when the user either taps, swipes, screen pinches or tilts their device to initiate the gyro function.
#4 - Unit testing
This is an essential part of writing code because it helps you catch any of those pesky errors that you might otherwise overlook. It's best to keep unit tests modular.
Each test should check for a specific, basic type of behavior to see if it's doing what it should be. If you write unit tests that are long or complicated, finding out what's going wrong is going to be much more difficult. If you're a layman who has somehow managed to limp their way to this point, you really shouldn't skimp on hiring a good coder here. Having a pro un-jumble your efforts is a godsend.
As a final note, there is no such thing as doing too much or having too many testers. Hire a freelance mobile app developer to perform to test your mobile app before publishing it to the app store.
Phase 5: Finalizing the app
Once everything is running as it should in the Simulator (and you've squelched a bunch of the major bugs ), you can move to other concerns. Apple runs a pretty tight ship as far as marketplaces go, and so you'll need to make sure that your newborn app can sit upon that digital shelf with all of the accoutrements expected.
We're talking about a product blurb, preferably supplied by a professional writer (somebody who knows how to spruit your work and entice interest). You'll also need screenshots, background images and that all important app icon. Honestly, you really need these (often tiny) little pictures to tell more than a thousand words, because app store users are spoiled for choice. You need to entrust the very important design of these to an expert graphical artist.
Phase 6: Submission
Last but not least, you need to submit your app to Apple for the approvals process, also known as ‘App Review’. Essentially, this is the ‘Big A’ ensuring that everything on their platform is reliable, performs as expected, and is free of offensive material. This will mean pouring over the Apple Developer Program License Agreement to understand your obligations and responsibilities. Or, hiring an expert app developer to do the leg work for you!
While this could be something you can do yourself, hiring an app developer can save you a significant amount of time, and because it’s a process they’ve done time and time again, they will all too often know what to watch out for, and they’ll be able to get the app ready to submit far quicker than someone who is doing this for the first time.
This part of the journey gets considerably more complex if your app deals in user account information or special instructions and/or settings. Failing to provide that info up front can delay the app review process or get you outright rejected. Once again, we'd recommend you dodge these landmines by having a coder on hand to identify anything out of the ordinary before the submission process, especially if you're working to a tight launch window.
Final words
Knowing the steps involved in iOS app development helps you figure out who to hire, keep track of your app's progress, and better communicate the specific type of app you want created.
While it’s true that Apple have provided some highly intuitive tools for building iOS apps; to get the best results, you still need a professional app developer, coders, designers, copywriters, and UX experts to help you give your idea the best chance of success.
You can hire professional in any of these industries (and a whole heap more) on Freelancer.com
Cuéntanos qué trabajo necesitas encargar
Ingresa el nombre de tu proyecto
Historias relacionadas


Habla con uno de nuestros Copilotos técnicos para que te ayude con tu proyecto
Artículos recomendados solo para ti

Developing a hybrid application will save you from having to hire two different platform developers for your project. In this post we show you how.
6 min read

Market research is a critical step in developing your mobile app. It tells you who your customers are, who your competitors are and how to succeed
8 min read

Do you know how well your app is performing? With analytics software you can monitor how often your app crashes and even how users interact with it.
6 min read
Got a great idea for a mobile app? Find out what questions you can ask to ensure you end up hiring the right freelancer to build it.
6 min read
¡Gracias! Te hemos enviado un enlace para reclamar tu crédito gratuito.
Algo salió mal al enviar tu correo electrónico. Por favor, intenta de nuevo.
Falló el copiado al portapapeles. Intenta de nuevo después de ajustar tus permisos.
Copiado al portapapeles.
Cargando visualización previa
Permiso concedido para Geolocalización.
Tu sesión de acceso ha expirado y has sido desconectado. Por favor, inica sesión nuevamente.